Object Detection: Running YOLOv11 on EdgeTPU
In this post we are going to demonstrate how to use RAiV (with EdgeTPU) and Yolo v11 for object detection. You can think this post as a crash course to the usage of visual artificial intelligence models.
Introduction to Edge AI
What is an AI Model and Edge AI
In a nutshell, an AI model is a list of operation layers (like multiplication, addition...) and a list of weights associated with these layers. Processors execute the operations with the weights starting from the beginning (input layer) and calculate the output.
AI models are generally run on PC or in a cloud environment. However, some of these models can also be run on smaller devices. Running AI models locally in a stand alone device is called Edge AI.
What is EdgeTPU
During the running of an AI model (which is called inference), CPU may use specialized devices (hardware accelerators) or helper libraries to speed up the computation processes. Using helper devices or libraries is called delegation.
EdgeTPU, which is used in RAiV, is a delegation device (a hardware accelerator). CPU offloads suitable layers to EdgeTPU and EdgeTPU does the computation of these layers. Then EdgeTPU sends the results back to CPU. So, while EdgeTPU is busy on running the layers, CPU can work on other tasks.
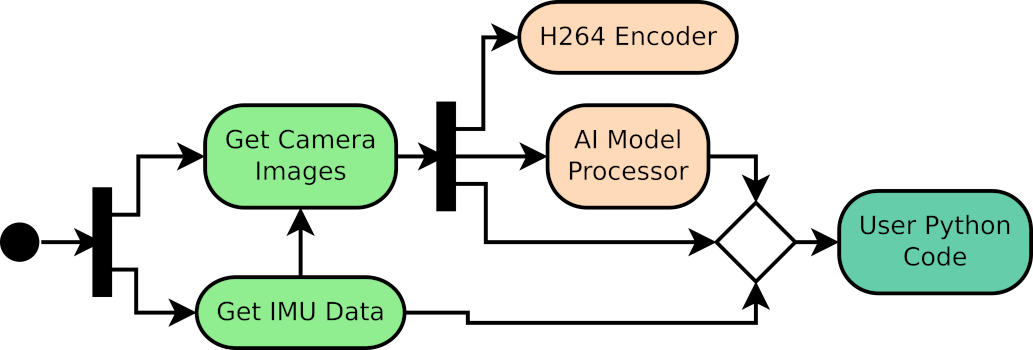
Workflow
You can find a general workflow for AI model utilization with RAiV below. The workflow is just for introductory purposes. In the current post, as we are going to use a trained Yolo model, we will skip the first step of the workflow.
Prepare AI Model
- Create training and validation datasets.
- Train and validate the AI model.
- Export the AI model for the EdgeTPU or compile it with edgetpu_compiler.
Upload and Release
- Upload the AI model by using the RAiV's user web interface.
- Release the model by using the RAiV's user web interface.
- RAiV feeds image data to the AI model and runs it, then stores the output layers to the data pipeline.
Prepare Python Postprocessor
- Use python script to access the data pipeline.
- Examine the output data (threshold, merge, reshape, etc).
Upload the Scripts
Upload the python script(s) by using the RAiV's user web interface.
Trigger the Data Pipeline
Trigger data pipeline by using:
- Snapshot
- Live Stream
- Capture Frame
- Collect Samples
Let's Use AI
As we have mentioned previously, this post is a crash course to using RAiV's edge AI capabilities. In order to keep the post simple, we are going to use a pretrained version of a popular AI model. Then we will apply postprocessing to its outputs by using python script.
Prepare Yolo v11 for EdgeTPU
YOLO (You Only Look Once) is a popular visual object detection AI model. Among different version of YOLO, we have selected the latest YOLO model (as of the date of development), Yolo-v11 for this post: coco_yolo11n_full_integer_quant_edgetpu.tflite. You can download the model file from our Github Repository. You can find more information about Yolo-v11 on the official Yolo-v11 Webpage
The selected pretrained Yolo-v11 AI model was trained on the well-known COCO dataset for object detection. So, out of the box, it can detect variety of daily objects (like person, laptop, orange, mug, bus, etc).
Upload & Release the Model
Login to the user account of the RAiV's web interface. Click to the "AI Settings" button on the right to open the AI settings parameter panel. On the opened panel click to the brain icon with "Upload AI Model" tooltip to open the file selection dialog box. Select the downloaded model and upload.
After successfully uploading the model, RAiV checks the usability of the model. If the model is usable, "READY" status is shown in the AI parameters panel. In this case to enable the usage of the model click to the rocket icon with "Release AI" tooltip on the right. After the release of the AI model, data pipeline will feed images to uploaded AI Model. To unrelease the model, click to the parachute icon with "Unrelease AI" tooltip.
Final Touches with Python
Data Pipeline - Yet Again
After uploading the AI model and releasing it for usage, data pipeline feeds images to AI model and transfers the output of the model to the user's Python code. As in the image acquisition case, user's python script should just check for available data from AI.
Note that for simplicity, data from the output of the AI model also includes the input image of the model. So, with a single call to data pipeline, user can get both the data of AI model input and output.
Yolo Postprocessor - Why do We Need One?
AI models generally do not produce ready to use outputs. These models are mostly needed to be reshaped and filtered. Our Github repository contains an example code for the postprocessing of the Yolo model.
Prepare & Upload the Code
Briefly in the code below, we get AI model output from data pipeline by calling getDataAi() and post processing it according to our needs for object detection.
You can find this example in our Github Repository with all the necessary modules. Please download the example code from the github repository and upload it to RAiV via the web interface.
# For accessing data pipeline
from qCU_Data import qCUData

# For Yolo Helper Functions
from YOLOv8ObjectDetector import YOLOv8ObjectDetector


def main():

# Create interface
    theQCUData = qCUData()

    # Initialize shared memory
    if not theQCUData.init():
        print("Failed to initialize shared memory")
        return

    # Initialize COCO classes
    COCO_CLASSES = [
        "person", "bicycle", "car", "motorcycle", "airplane", "bus", "train",
        "truck", "boat", "traffic light", "fire hydrant", "stop sign",
        "parking meter", "bench", "bird", "cat", "dog", "horse", "sheep",
        "cow", "elephant", "bear", "zebra", "giraffe", "backpack", "umbrella",
        "handbag", "tie", "suitcase", "frisbee", "skis", "snowboard",
        "sports ball", "kite", "baseball bat", "baseball glove", "skateboard",
        "surfboard", "tennis racket", "bottle", "wine glass", "cup", "fork",
        "knife", "spoon", "bowl", "banana", "apple", "sandwich", "orange",
        "broccoli", "carrot", "hot dog", "pizza", "donut", "cake", "chair",
        "couch", "potted plant", "bed", "dining table", "toilet", "tv",
        "laptop", "mouse", "remote", "keyboard", "cell phone", "microwave",
        "oven", "toaster", "sink", "refrigerator", "book", "clock", "vase",
        "scissors", "teddy bear", "hair drier", "toothbrush"
    ]

    # Initialize Yolo detector post processor
    objDetector = YOLOv8ObjectDetector(ai_classes=COCO_CLASSES, confidence_threshold=0.25, iou_threshold=0.45)

    # Enter object detection loop
    try:
        while True:
            # Get Ai data
            ai_data = theQCUData.getDataAi()
            if ai_data:
                if 'error' in ai_data:
                    print(f"Error occurred: {ai_data['error']}")
                else:
                    # Postprocess the ai_data
                    detected_objects = objDetector.detect_objects(ai_data)

                    # Get the ai preprocessing parameters
                    aiHeader = ai_data['header']
                    aiPrepro = aiHeader.imPreproPrms

                    detected_objs_image = []
                    for obj in detected_objects:

                        # Convert yolo coordinates to image coordinates
                        bbox_img_float = objDetector.yolo_to_coords_float(aiPrepro, obj['bbox'])
                        bbox_img_int = [int(coord) for coord in bbox_img_float]

                        detected_objs_image.append({
                            'class_id': obj['class_id'],
                            'class_name': obj['class_name'],
                            'confidence': obj['confidence'],
                            'bbox': bbox_img_int,
                        })

                    # Print the detected objects
                    print(detected_objs_image)

                    # Do not forget to delete the ai data key references and the ai data
                    del ai_data['data'], ai_data['input_frame_right'], ai_data['input_frame_left'], ai_data['header']
                    del ai_data
            else:
                # Wait to avoid high CPU utilization
                time.sleep(0.1)
    finally:
        print("Cleanup completed")

if __name__ == "__main__":
    main()
Live Action: Feed the Data Pipeline
Now to trigger the data pipeline, please press the "Snapshot" button. After the image is displayed on the web interface, check the Console Output or the PC application.
What is Next?
To start depth map estimation:
From Stereo to Depth: Building Your First Depth Map with OpenCVCheck our Python SDK:
RAiV Python SDKCheck our Github Repository For Sample Codes:
Our Github Repository