Structure of the System

Introduction

Robotic Ai Vision (RAiV) is an highly integrated stereo camera. RAiV is able to get 3D measurements, do 3D automation and make 3D quality control. RAiV is designed to be used in factory/workshop areas. This guide provides information on how to use RAiV and its features.

Main Features

RAiV designed to be a flexible multi-role camera system. It can be used with industrial robots, automation systems, unmanned ground vehicles and other 3D demading applications. As a result of this, RAiV has various data interfaces such as GigE, WiFi6, CanBus, RS-485 and signal interfaces such as PWM and general purpose I/O.

The locations of electrical and mechanical connectors can be viewed in the image below:

RAiV General Overview

Data Pipeline

One of the main software features of RAiV is users can upload their own python codes to RAiV. By uploading custom python codes, the user can implement the desired functionality. RAiV checks the uploaded python codes and runs them in sandboxed environment.

The user's python code executed continously. The code can get acquired IMU samples, stereo images and neural network model outputs any time from data pipeline. RAiV has the following data pipeline:

RAiV Data Pipeline

For more information please refer to the technical details page of Robotic Ai Vision (RAiV) and our blog

Connection

To configure, please prepare the following items:

  • RAiV
  • A computer with a wired network and a web browser.
  • Ethernet cable
  • 12 or 24VDC 2A power supply
  1. Set the computer's wired network connection according to the parameters given below:
  2. IP 192.168.10.2
    Netmask 255.255.255.0
    Gateway 192.168.10.1
  3. Connect the computer directly to RAiV.
  4. Open to the web interface RAiV:
  5. http://192.168.10.55

    Warning

    The instructions here are for a device with default settings.

    To load the default settings to RAiV, press the "Reset" button which is at the back of the device for about 3 seconds (until the blue and orange lights flash). Then release the reset button and wait for the device to reboot.

Web Interface Layouts

There two different web interface layouts for admin and user.

Admin Web Layout

There is one main panel in the administrator's web interface. Administrator can use the buttons in this panel to navigate along the settings.

  1. Button set for panel display selection

User Web Layout

There are five panels in the user's web interface.

  1. Commands Panel
  2. User can use the buttons in this panel to select the desired option and show its settings in the parameters panel.

  3. Parameters Panel
  4. Parameters of the selected option is shown here with its corresponding buttons.

  5. Image List Panel
  6. This panel shows the images stored in the memory of the device. User can either use "Capture Frame" button or "Collect Samples" button to get images to memory

    The images here can be deleted, downloaded or shown in the "Screen Panel" by clicking on them one by one

    All of the images here can be deleted or downloaded also.

  7. Screen Panel
  8. This area is used for displaying:

    • The image selected on the "Image List" panel
    • The image taken by using the snapshot button or
    • The output of the live stream
  9. Streaming & Health Panel
  10. This panel is used for starting/stop the live h264 stream, displaying health report and displaying the system status gauges.

Access/Password

Click to the "ACCESS/PASSWORD" button to change the user and administrator login name and password.

After changing the user and/or administrator name password, press the "Save" button.

Network

Click to the "NETWORK" button to change the network parameters and enable/disable the WiFi interface.

After changing the network settings, press the "Save" button.

Date/Time

Click to the "DATE/TIME" button to change the date and time settings.

The current date time is showned on the text fields. You can either:

  • manually set the date/time or
  • use "GET DATE/TIME" button to set the computer's date and time to the fields.

After changing the date time, press the "Save" button.

Camera Settings

Click to the "Camera Settings" button on the commands panel to open the "Camera Settings" parameters panel.

You can update the "exposure" and "gain" values by using sliders or editing the text values under the sliders.

After changing the camera settings, to save the changes, press the "floppy disk" button.

Python Option

You can use python code to set the exposure and gain values or to implement automatic gain exposure adjustment feature.

Image List

"Image List" panel is used for capturing, downloading and deleting the frames.

The panel has two tabs. Only "Train Images" panel can be used in RAiV. The image list panel has the following buttons:

  • Capture Frame: This button is used for capturing a stereo image pair. The captured images are appended to the image list. User can display the desired captured image on the "screen" panel by clicking on its thumbnail in the list.
  • Delete Image: This button is used for deleting an image. Click to the thumbnail of the image to be deleted in the image list and press this button.
  • Download Image: This button is used for downloading an image. Click to the thumbnail of the image to be downloaded in the image list and press this button. The image is downloaded by the browser.
  • Download All Images: This button is used for downloading all of the images in the image list as a "zip" file. Just click to this button and wait for zip file to be downloaded.
  • RAM Usage

    Images are stored in memory in an uncompressed BMP file format. Each of the images has an approximate size of 6.2MB. For a collection of 75 stereo image pairs (150 images), the zipped file will have a size of around 900MB. Since the zip file is stored in the computer's RAM during the download process, the downloading computer should have sufficient available RAM and SWAP space.

  • Delete All Images: This button is used for deleting all of the images in the image list. After clicking this button, a warning dialog box is shown and user acknowledgement is required before deleting all of the images.

Snapshot

When the snapshot button on the commands panel is clicked, a stereo image pair is captured without saving them to the disk.

Utilization

The snapshot button is mostly used for:

  • Checking the orientation of the camera
  • Validating the user's python code. Because, with snapshot, the entire image data pipeline is activated and user's code is fed.

Live Streaming

RAiV has an integrated hardware H264 encoder. By using the hardware h264 encoder, mono or stereo images can be streamed to browser.

When the "live" button on the streaming & health panel is clicked, a live h264 stream is created and the browser displays the captured mono or stereo images without saving them to the disk.

Utilization

The live button is mostly used for:

  • Checking the orientation of the camera
  • Validating the user's python code. Because, as in the snapshot case, with live, the entire image data pipeline is activated and user's code is fed continuously.

Python Option

The live h264 streaming can also be enabled or disabled by the user's python code. The live stream uses websocket protocol for streaming, as a result, the encoded stream can be received by any device/program which has websocket support.

AI Settings

Click to the "AI Settings" button on the commands panel to open the "AI Settings" parameters panel.

The "AI Settings" parameters panel shows:

  • AI Model's File Name
  • AI Model's Upload Date
  • AI Model's File Size
  • AI Model's Status
  • Model's AI Proc. Time (ms) (if available)

The "AI Settings" parameters panel has three buttons. These buttons are used for deleting, uploading and downloading AI model.

Model Type

RAiV is based on "TensorFlow Lite". As a result of this, RAiV accepts only tflite models.

Moreover, Google's Edge TPU device can be utilized, if the tflite model was:

  • compiled with edgetpu_compiler <your_model>.tflite
  • or exported with <YOLO>.export(format="edgetpu")

In order to utilize the AI model, user should Release it by pressing the button.

User can Unrelease the loaded AI model by pressing the button.

I/O Settings

Click to the "IO Settings" button on the commands panel to open the "IO Settings" parameters panel.

RAiV allows python controlled or time-controlled & automated response on input and output pins.

If the trigger of an IO pin is defined as "python". The user's python code can access the pin and use its input or manupulate its output.

If the Input #1 is defined as "capture", the image acquisition is triggered by the input #1. This configuration is useful in high-speed environments where an external sensor can output a signal to initiate the capture, instead of continuous image acquisition.

If the Output #1 or Output #2 is defined as "Input #1", the output pins are triggered with the signal of input #1 without any user intervention. Moreover, the output signals delay and duration can be set by setting the "Delay (ms)" value or "Duration (ms)" value, respectively.

After changing the camera settings, to save the changes, press the "floppy disk" button.

In addition to the digital I/O pins, RAiV also has two PWM pins. These pins can only be accessible and manipulated by the user's python code.

Python Settings

Click to the "Python Settings" button on the commands panel to open the "Python Settings" parameters panel.

RAiV can run the user's python codes in sandboxed environment. The "Python Settings" parameters panel is used for:

  • Checking the status of the user's python code
  • Setting the user's python code data Feed Interval (ms)
  • Enabling or disabling the execution of the user's python code by clicking the icon
  • Getting the Console Output of user's python code.

Console Output

The console output includes the user's print() calls, the python interpreters outputs and RAiV's sandbox checks.

Python File Management

The user's python files are managed in Python Deployment parameters panel

Collect Samples

Click to the "Python Settings" button on the commands panel and open the "Python Settings" parameters panel.

Collect Samples is used for recording images to the device's internal memory for downloading and external offline processing such as AI model training or python code development.

To start sample collection, the check box of the sample collection should be enabled. After enabling the checkbox, the user can start and stop sample collection by using the and buttons.

Recording Process

The sample collection process can be viewed by getting the Console Output.

If an AI model is loaded and released, the AI model output is also recorded with the images.

Viewing Sample Images

After stoping the sample collection, Image List panel shows the collected image samples.

The collected image and AI model output samples can be downloaded by pressing the button.

The collected image and AI model output samples can be deleted by pressing the button. This button only deletes the collected samples, it has no effect on images captured with Capture Frame.

Python Deployment

Click to the "Python Deployment" button on the commands panel to open the "Python Deployment" parameters panel.

The Python Deployment panel displays the loaded Python files' file name, file size and upload date.

The Python Deployment panel has the following buttons:

  • Upload Python File: This button is used for uploading a single python file.
  • Download Python File: This button is used for downloading a python file. Click to the file to be downloaded in the list of loaded python files and press this button. The python file is downloaded by the browser.
  • Download All Python Files: This button is used for downloading all of the loaded python files as a "zip" file. Just click to this button and wait for zip file to be downloaded.
  • Delete Python File: This button is used for deleting a python file. Click to the file to be deleted in the list of loaded python files and press this button.
  • Delete All Python Files: This button is used for deleting all of the loaded python files. After clicking this button, a warning dialog box is shown and user acknowledgement is required before deleting all of the python files.

Health Report

For diagnostic purposes, RAiV can generate Health Report. Health report can be generated by clicking the icon on the right of the streaming & health panel.

The healt report includes:

  • Camera Settings
  • AI Parameters
  • IO Settings
  • Python Settings
  • The list of loaded python files
  • The list of captured images
  • System status

System Monitor

For diagnostic purposes, RAiV can display live System Status. The system status can be viewed by clicking the icon on the right of the streaming & health panel.

The system status includes:

  • CPU Utilization Percentage
  • RAM Utilization Percentage
  • Disk Utilization Percentage
  • CPU Temperature
  • IMU Temperature

qCU_Print: Hook for Stdout

A Python utility module for configuring the "USB Debug" serial port and redirecting standard output to the USB Debug port.

qcu_print_enable Lifecycle

Enables dual printing to both stdout and the USB Debug serial port. This allows standard print statements to be captured remotely by using the USB Debug port at the back of the RAiV.

def qcu_print_enable(port='<optional>')

Parameters

Name Type Description
port str Optional - The device path of the USB Debug serial port.

Example

import qCU_Serial
# Enable output to serial
qCU_Serial.qcu_print_enable()
print("Hello Serial") # Appears on screen and serial

qcu_print_disable Lifecycle

Disables dual printing to both stdout and the USB Debug serial port, and restores the normal print function (output only to stdout).

def qcu_print_disable()

Example

import qCU_Serial
qCU_Serial.qcu_print_disable()
print("Back to normal")

qCU_Net: TCP Client & Server

A Python networking module for transmitting JSON-encoded data over TCP/IP sockets. Includes client and server functionalities with a length-prefix header and payload protocol.

send_data_to_server Client

Sends a JSON-encoded payload to a server over Ethernet/TCP.

def send_data_to_server(host, port, json_payload)

Parameters

Name Type Description
host str The server's IP address or hostname.
port int The server's port number.
json_payload dict The JSON-encoded dictionary to be sent.

Example

import qCU_Net
data = {"cmd": "start", "val": 100}
qCU_Net.send_data_to_server("127.0.0.1", 5000, data)

start_tcp_server Server

Starts a TCP server that receives JSON messages with length-prefixed header and payload. It runs in an infinite loop and accepts connections sequentially.

def start_tcp_server(host='localhost', port=12345, json_handler=None)

Parameters

Name Type Description
host str The address to bind to (default: 'localhost').
port int The port to listen on (default: 12345).
json_handler callable Callback function: handler(client_socket, json_payload, client_address). If None, prints to console.

Example

import qCU_Net

# Sample implementation of a json payload handler 
def sample_json_handler(client_socket, json_payload, client_address):
    print(f"Custom handler called for client {client_address}")
    print(f"Received payload: {json_payload}")


# Start the TCP server with sample json handler
qCU_Net.start_tcp_server(host='192.168.10.55', port=12345, json_handler=sample_json_handler)

send_response_to_client Server

Sends a JSON-encoded response to a connected client over an existing socket. Use this inside your json_handler to reply.

def send_response_to_client(client_socket, json_payload)

Parameters

Name Type Description
client_socket socket.socket The connected client's socket object.
json_payload dict The JSON-encoded dictionary to be sent.

Returns

Type Description
bool True if successful, False otherwise.

Example

# Sample implementation of a json payload handler 
def sample_json_handler(client_socket, json_payload, client_address):
    print(f"Custom handler called for client {client_address}")
    print(f"Received payload: {json_payload}")
    
    # Define payload in json format
    payload = {
        "status": 1
    }
    
    # Send payload to client
    qCU_Net.send_response_to_client(client_socket, payload);

qCU_Data: Data Acquisition

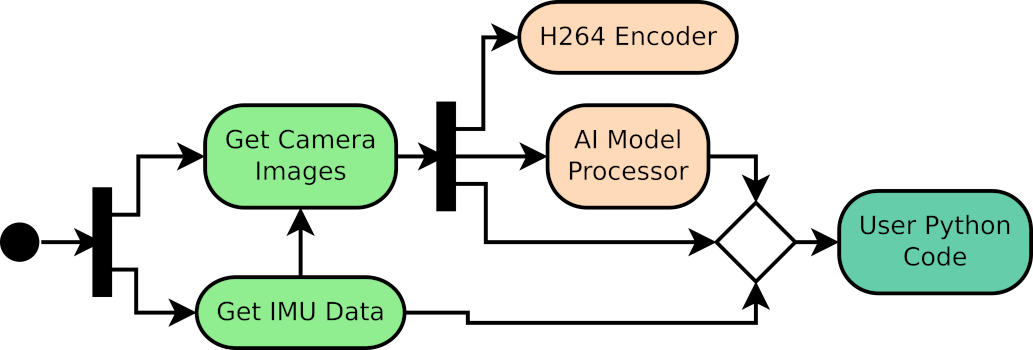
A Python interface module for accessing shared memory buffers containing stereo camera frames, AI model outputs and IMU data. This class provides methods to initialize the memory interface, retrieve frame, AI output and IMU data and get stereo camera calibration parameters.

getMemoryConfiguration Config

Return the memory configuration as a dictionary.

def getMemoryConfiguration(self)

Returns

Type Description
dict Configuration containing frame dimensions, BPP, and buffer sizes.

load_calibration Config

Loads stereo calibration data from a YAML file.

def load_calibration(self, calib_file='<optional>')

Parameters

Name Type Description
calib_file str Optional - Path to the stereo calibration YAML file.

Returns

Type Description
list Loaded calibration data structures.

load_rectification Config

Loads rectification maps from an NPZ file.

def load_rectification(self, recti_file='<optional>')

Parameters

Name Type Description
recti_file str Optional - Path to the rectification maps NPZ file.

Returns

Type Description
list Loaded rectification map arrays.

init Lifecycle

Initialize shared memory interface.

def init(self)

Returns

Type Description
bool True if successful, False otherwise.

isInitialized State

Check if the shared memory interface was initialized.

def isInitialized(self)

Returns

Type Description
bool True if initialized, False otherwise.

getDataFrame Data

Checks indices and returns the latest frame if available.

def getDataFrame(self)

Returns

Type Description
tuple frame_data is numpy array (2, height, width, bpp) or None.

Raises

RuntimeError: If shared memory is not initialized.

getDataFrameImu Data

Checks indices and return frame and frame's IMU data, if new data is available.

def getDataFrameImu(self)

Returns

Type Description
tuple

(frame_data, frame_imu_data):

  • frame_data (int): numpy array (2, height, width, bpp) or None
  • frame_imu_data (dict): Dictionary containing IMU measurements with the following keys:
    • 'accel_x', 'accel_y', 'accel_z' (float): Last Linear acceleration components in g (gravitational units)
    • 'gyro_x', 'gyro_y', 'gyro_z' (float): Accumulated Angular velocity components in °/s (degrees per second)
    • 'temp' (float): Sensor temperature in °C
    • 'timestamp' (float): Sample acquisition timestamp in seconds (floating-point representation)
    • 'isValid' (bool): Validity of the IMU data

Raises

RuntimeError: If shared memory is not initialized.

getDataRawImu Data

Get the latest raw IMU data from the ring buffer.

def getDataRawImu(self)

Returns

Type Description
tuple

(imu_data, current_imu_index):

  • imu_data (dict): Dictionary containing IMU measurements with the following keys:
    • 'accel_x', 'accel_y', 'accel_z' (float): Linear acceleration components in g (gravitational units)
    • 'gyro_x', 'gyro_y', 'gyro_z' (float): Angular velocity components in °/s (degrees per second)
    • 'temp' (float): Sensor temperature in °C
    • 'fsyncAgo' (int): Time elapsed since last FSYNC pulse in microseconds
    • 'timestamp' (float): Sample acquisition timestamp in seconds (floating-point representation)
  • current_imu_index (int): Monotonically increasing index identifying the current IMU sample in the acquisition sequence

Raises

RuntimeError: If shared memory is not initialized.

getDataAi Data

Retrieves AI processed data.

def getDataAi(self, timeout=5)

Parameters

Name Type Description
timeout int Timeout in seconds to wait for data.

Returns

Type Description
dict Dictionary containing AI processing results with the following keys:
  • 'data' (numpy.ndarray or similar): Processed AI output data (e.g., inference results, feature vectors, or model predictions)
  • 'header' (dict or structured object): Metadata/header information associated with the AI output, including timing, sequence numbers, or processing parameters
  • 'input_frame_right' (numpy.ndarray or buffer): Right camera frame that was processed by the AI model
  • 'input_frame_left' (numpy.ndarray or buffer): Left camera frame that was processed by the AI model
  • 'success' (bool): Boolean flag indicating whether AI processing completed successfully (True for success, False for failure)

forceFunctionStop Internal

Call this from another thread to cancel blocking AI data acquistion calls.

def forceFunctionStop(self)

cleanup Lifecycle

Clean up shared memory resources. (Note: Shared memory itself is not cleaned up by Python).

def cleanup(self)

qCU_Stream: H.264 Streaming

A Python utility module for enabling and disabling the H.264 hardware encoder and setting its mode (mono or stereo).

setEncoderStatus Control

Set the hardware H.264 encoder's state and mode.

def setEncoderStatus(isStart, isStereo)

Parameters

Name Type Description
isStart bool Flag indicating whether to start or stop the encoder.
isStereo bool Flag indicating if the mode is stereo (True) or mono (False).

Returns

Type Description
int 0 on success, -1 on error.

qCU_CCtrl: Camera Control

Python interface module for controlling camera hardware parameters such as gain and exposure time. Communicates with the underlying camera driver to adjust settings dynamically.

init Lifecycle

Initialize the camera control interface.

def init(self)

terminate Lifecycle

Terminate the camera control interface.

def terminate(self)

get_cam_ctrl_ranges Config

Retrieve the valid minimum and maximum ranges for camera controls like exposure and gain.

def get_cam_ctrl_ranges(self)

Returns

Type Description
tuple

(expo_min, expo_max, gain_min, gain_max)

  • expo_min (int): Minimum allowable exposure time value
  • expo_max (int): Maximum allowable exposure time value
  • gain_min (int): Minimum allowable gain value
  • gain_max (int): Maximum allowable gain value

These values define the valid operating range for camera exposure and gain settings that can be configured via the sensor driver.

set_gain Control

Set camera gain.

def set_gain(self, gain)

Parameters

Name Type Description
gain int Gain value to set.

Returns

Type Description
int 0 means success.

set_exposure Control

Set camera exposure.

def set_exposure(self, exposure)

Parameters

Name Type Description
exposure int Exposure value to set.

Returns

Type Description
int

set_expo_gain Control

Set both camera exposure and gain simultaneously.

def set_expo_gain(self, exposure, gain)

Parameters

Name Type Description
exposure int Exposure value to set.
gain int Gain value to set.

Returns

Type Description
int 0 means success.

get_expo_gain Data

Get current camera exposure and gain values.

def get_expo_gain(self)

Returns

Type Description
tuple

(exposure, gain, return_code)

  • exposure (int): Current camera exposure value
  • gain (int): Current camera gain value
  • return_code (int): 0 means success.

qCU_PinBus: GPIO & PWM

Python interface module for hardware, allowing control over GPIO (General Purpose Input/Output) pins and PWM (Pulse Width Modulation) signals.

gpin_read Hardware

Read the digital value from a General Purpose Input (GPIN) pin.

def gpin_read(pin)

Parameters

Name Type Description
pin int The GPIN pin number to read from.

Returns

Type Description
int The digital value read from the pin (0 or 1).

gpout_write Hardware

Write a digital value to a GPOUT pin.

def gpout_write(pin, value)

Parameters

Name Type Description
pin int The GPOUT pin number to write to.
value bool The boolean value to write (True for High, False for Low).

Returns

Type Description
int 0 means success.

pwm_write Hardware

Configure a PWM signal on a specific pin.

def pwm_write(pin, periodMs, dutyMs)

Parameters

Name Type Description
pin int The pin number to output the PWM signal.
periodMs int The period of the signal in milliseconds.
dutyMs int The active duration (duty cycle) of the signal in milliseconds.

Returns

Type Description
int 0 means success.

qCU_Uart: UART Wrapper

Documentation to be added.

qCU_RS485: RS-485 Wrapper

Documentation to be added.

qCU_ModbusRTU: RTU Helper

Documentation to be added.

qCU_CAN: CanBus Wrapper

Documentation to be added.