Take the Shot: Capturing Your First Stereo Image
In this post will go deeper into the RAiV's data pipeline and through it we will get our first stereo image and transfer it to a PC.
Get Ready to Capture
Capturing a stereo image by using the web interface is easy. Just login to RAiV's user account and press "Capture Frame" on the left panel, that's all. However, capturing an image by using Python code is a little bit complex. With Python, you have to get the stereo image pair directly from the data pipeline.
Data Pipeline - Process
The core of RAiV is data pipeline. Every sensor on the device feeds the data pipeline continuously. Sensors only stop feeding, when there is a login to RAiV's user web account. Even in that case you can trigger the data pipeline by using "Capture Frame", "Snapshot", "Collect Samples" or "Live Stream" buttons.
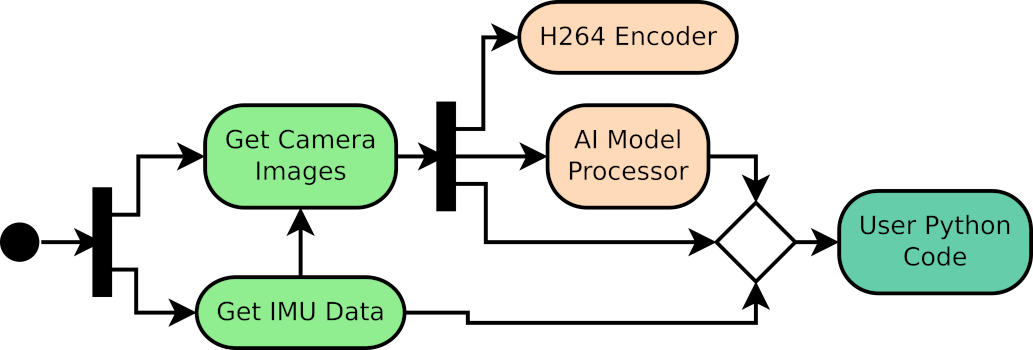
In the diagram above, please noticed that user's python code have a direct access to captured camera frames via the data routing. In this section, we are going to use this data route.
Prepare & Upload Your Python Code
The code below is a simple demonstration of how you can get stereo image from the data pipeline. Briefly, in the code below, we are using:
- qCU_Net python module for TCP network communication. More details on our previous post.
- qCU_Data python module to access the data pipeline and get stereo image.
- raw_to_bmp_bytes function from helper_funcs python module for converting the raw image data to bmp image
- base64 python module for the bmp image transmission over TCP.
import qCU_Net

# For accessing data pipeline
from qCU_Data import qCUData

# For creating reformating raw image pair
from helper_funcs import raw_to_bmp_bytes
import base64

def main():
    # Create data pipline interface
    theQCUData = qCUData()

    # Initialize the data pipeline interface
    if not theQCUData.init():
        print("Failed to initialize memory")
        return

    # Enter image acquisition loop
    try:
        while True:
            # Get Stereo Frame Data
            frame_data = theQCUData.getDataFrame()
            if frame_data:
                if 'error' in frame_data:
                    print(f"Error occurred: {frame_data['error']}")
                else:
					print("Acquired stereo frame")

                    # Get bmp from raw images
                    bmp_bytes_right = raw_to_bmp_bytes(frame_data[0], width=1600, height=1300, channels=3)
                    bmp_bytes_left = raw_to_bmp_bytes(frame_data[1], width=1600, height=1300, channels=3)
                    # Encode bmps to base64 strings
                    bmp_b64_right = base64.b64encode(bmp_bytes_right).decode('utf-8')
                    bmp_b64_left = base64.b64encode(bmp_bytes_left).decode('utf-8')

                    # Build payload for the transmission
                    payload = {
                        "bmp_b64_right": bmp_b64_right,
                        "bmp_b64_left": bmp_b64_left
                    }
                    qCU_Net.send_data_to_server("192.168.10.2", 12345, payload)

					# Do not forget to delete the frames
                    del frame_data
            else:
                # Wait to avoid high CPU utilization on idle
                time.sleep(0.1)

    finally:
        print("Loop Ended")


if __name__ == "__main__":
    main()
You can find this example in our Github Repository with all the necessary modules. Before moving to next section, please download the example code from the github repository and upload it to RAiV via the web interface.
- The Example Files for RAiV:
- user_main.py
- helper_funcs.py
- The Example File for PC:
- pc_receiver.py
Live Action: Feed the data pipeline
Now to trigger the data pipeline, please press the "Snapshot" button. As soon as the image is displayed on the web interface, PC side also receives the a stereo image pair and displays it.
Note that bmp images from RAiV has approximately 6MB size. As we are transferring a stereo image which is 12MB, there may be a lag on PC reception depending on the used network.
The image transfer method in this post is only for demonstration. We highly encourage you to use H.264 live stream in your applications. You can find a blog post about it on our site and example code in our Github repository.
What is Next?
To start object detection:
Object Detection: Running YOLOv11 on EdgeTPUCheck our Python SDK:
RAiV Python SDKCheck our Github Repository For Sample Codes:
Our Github Repository